Sterling College Farmstead Arts students journal their class experiences, projects and thoughts
Thursday, June 30, 2011
Lapidary Arts - Cutting and Polishing Stones
To work with stone it will help to have a machine. We used the "Inland Swamp Top All-In-Wonder Lapidary Machine." It is a basic wet saw as would be used to cut tile but the top flips over and different attachments can be added for different purposes. From the middle ages up until the industrial revolution slabbing and polishing wheels were powered by water wheels in rivers. In Vermont, marble, slate, and granite are abundant and have been mined from the hills for hundreds of years. In fact, the first marble quarry in the United States was on Mount Aeolus overlooking East Dorset, Vt. Here is a description by Ronald Robinson of the marble quarries of Vermont in 1890:
"In the great pits, yawning wider and deeper every year, men and engines, in sunshine and in storm, delve all the seasons through. When the landscape is bright under the summer sun they may be seen, like ants toiling in their cells, hundreds of feet below the surface. Now and then an ant grows into a burly, grimy man, climbing the giddy stairs; or a small watercarrier, bearing, with careful steps, his heavy bucket to the thirsty workmen..."
The uses for polished stone are wide and varied. One could make soapstone chess pieces, obsidian arrow/spear/axe heads, obsidian scalpel edges such as the Incas used for surgery, inlays for belts/staffs/knife handles, mosaics, jewelry, paper weights, decorations, the list goes on. Today we just made some nice polished stones that can be altered further for various purposes. Here is how to do it.
After you select your stone, examine it to find what part of it you think will look best. You may want to check for cracks and faults as well to help determine which parts you would like to eliminate. The first step is to shape your stone using the diamond trim saw. Remove the top of the machine and set the blade in. Make sure to secure the arbor nut and note that like a table saw, it is tightened using a left hand thread. The trim saw will essentially achieve "slabbing" on a micro scale. Fill the water reservoir of the machine and connect the drain hose to a waste bucket. Set the drip valve to have 1 or 2 drops every second falling onto the blade. Turn the machine on, wet the stone, and slowly feed the stone into the blade. The blade should begin to cut through the stone and you should notice water and stone dust draining out the tube into the waste bucket. You can continue cutting through the stone at different angles until you achieve your desired slab trim. Depending on your stone, you may start to notice some nice colors and patterns in the interior of the stone. If the saw starts to struggle you may need to push less hard, turn the RPM's up or down, or apply more water to the stone and blade.
Next you will need to take off the top of the machine and remove the trim saw with an Allen key. Attach the edger/grinder/shaper tool. Use this tool to remove or add corners and further refine the shape of your stone. This tool uses the opposite side of the top facing up as a water reservoir and a guard.
Next remove the edger/grinder/shaper and attach the 6" "master lap" which is a white plastic disc. Set the lap horizontally and allow it to touch the plastic below it and then lift it up just a scoce and secure with the Allen key. This lap will give stability to your polishing laps. Begin with a 325 grit lap (coarse grain) and attach it to your master lap. Next setup your dop station. It is an electrical heating element that had a reservoir for wax and shlack. Melt some wax in the reservoir and heat your stone on the edge. Use a small dowel and dip it in the wax. Place the wax tip on a side of the stone that you are not going to polish and press the wax down with your fingers to secure the dowel to the stone. The dowel will be your handle to keep your hands safe while polishing. Hold the dowel, wet your stone and apply it to the spinning lap at different angles. Turn the stone around to grind away divots and other imperfections. Repeat this process using 600, 1200 and finally 14,000 grain lap. Note that the finer the grain the faster the RPM's should be. During the last lap which is the polishing phase, the stone should be dry. You will begin to see a nice sheen develop on the stone that can make it appear almost precious. If you want to polish the side that the dop is attached to, freeze the dop stone and wax and the wax should break off very easily. Apply the dop to the already polished side and finish the job. The result might just surprise you with its brilliance.
The dop station with wax and rocks heating
Dop applied to stone
Using the dop stick to polish a stone
Some finished stones shining with brilliance!
More on Dyes
Here's the shirt with a sprig of Dyer's Greenwood on it.
Wednesday, June 29, 2011
Dying Vegetable Fibers
Tuesday, June 28, 2011
Natural Dyes!
The dye plants:
-madder root
-black walnut
-indigo (I do not believe that the indigo we used was sourced locally. Although it can grow in greenhouses in our climate)
-marigold
-turmeric (Nope, turmeric does not grow around here. But we thought we’d experiment with a common kitchen spice just for fun.)
These are only a few of the MANY possibilities. Some other options up here in Vermont include: rhubarb, berries (and their leaves), carrot tops, lichen, onion skins, and the list goes on.
Here Ethan breaks apart the black walnut. The outer shell is used for dying. The inner nut is quite tasty. We indulged.
Dyes boiling
Most of the dyes we made went towards dying eggs. We also experimented with a bit of cotton and wool fibers. Jacob and Matt will be dying cotton shirts and Erica will be dying a cotton comforter. With this process, the cotton needs to be prepped for a couple days, first using a tannin bath and then an alum bath. They will let us know how it goes! Animal fibers only require an alum bath, not the additional tannin bath required by plant fibers.
For the egg dyes, all we have to do is boil the dye plant in water until the color of the water becomes vibrant, add vinegar, and boil the eggs into the dye. We drew on some of the eggs with our leftover salve from our previous class as a resist. The eggs did not take on color where we put the salve. We noticed that adding washing soda to the madder root made the color much more vibrant and beautiful. I will never buy easter egg dye in a box again!
Eggs dyed with black walnut (brown eggs), madder root (pink eggs), and turmeric (yellow eggs).
Ethan is very excited to see the change in color after the addition of washing soda to the madder root!
In order to create dyes that are more permanent, it is necessary to soak the fibers in a mordant beforehand. Some dyes, called substantive dyes, do not any additions in order to adhere to whatever is being dyed. Mordants can be made out of several things, including: copper, aluminum, iron, rhubarb leaves, and oak galls. We added oak gall powder to our dyes that we used for dying cotton fibers.
These are chemical mordants, iron and copper.
For the fiber dyes, we experimented with indigo and the black walnut. The indigo was made ready with the addition of washing soda and thiourea dioxide to convert it from blue indigo to white indigo. This makes it soluble. The cotton fiber did not dye as well as we had hoped, possibly because of a lack of the thiourea dioxide. The wool did not give us a great result either. The black walnut-dyed cotton, however, came out beautifully with a very rich brown color.
Although this was a very brief taste of natural dying possibilities, we have the basic knowledge to do some further learning on our own. I recommend taking a look at the book that we referenced in class for some good ideas! Wild Color by Jenny Dean.
Monday, June 27, 2011
Beeswax as Bike Chain Lubricant?
After learning that wax is a common alternative to oil as a chain lubricant for bicycle chains, I was interested to find out if beeswax could do the trick. It appears that your average wax for bicycle chains contains 80% paraffin wax and 20% beeswax. The beeswax helps the paraffin to cling to the chain. It is a nice addition, but not always a part of the chain wax recipe.
The advantage to using wax on a chain is that it does not collect the dirt and debris that oil-based lubricants do. In order to wax your chain, you first detach the chain from the bicycle. You dip the chain in a pot of melted wax, let it dry, and put it back on your bike. A simple, yet definitely more labor-intensive process that squirting the oil directly on your bike. Depending on the source I read, I learned that this treatment can last from a mere 30 mile ride to 400-500 miles. The one pitfall to using wax is that it is not suited for rainy riding. Wax may not be the best chain lubricant, it seems, for us here in Vermont. Also, the majority of sources suggest that reapplication is required more frequently than with oil. The idea of a forever-clean chain is very enticing, and I might experiment with it anyway!
More on Wax
Bee's wax products also seem like a viable niche market to get into. If the products were high quality, unique, hand made items, they could probably do well at a farmer's market, craft fair, or specialty stores in both urban and rural areas. Some appealing packaging could help sales as well. The design would have to be something that invokes an Ol' Timey feel without looking obsolete. Selling salve, lip balm and candles alongside some raw honey could really show that you know your bees.
Bee's wax products could also help to value-add other farm products. Using bee's wax to seal cheese for example, as a finish on a homemade knife, or as a label on canned goods even. Again the possibilities are endless which is what makes bees so appealing. I have a new found respect for bees and all that they do. If only there was a way to harvest wax without running the risk of being stung that doesn't involve being covered head to toe. Actually, I wonder if ear wax would work for anything...
Sunday, June 26, 2011
Beeswax Salve ....
Thursday, June 23, 2011
Beeswax Salve
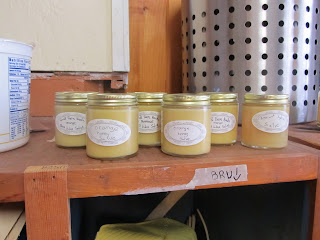
We chose to make a beeswax salve, which can be used comparably to Vaseline ointment for skin irritation, dryness or bruising. The recipe called for olive oil at a ratio of 3:1 to the beeswax. Some of the oil we used was infused with calendula and had been sitting infused for about a year. Calendula (pot marigold) has numerous healing properties and will enhance the salve.
We chopped the wax into 1" size pieces, which was not at all easy, and placed it in a double boiler to melt. Once the wax was melted, we slightly heated the oil so the wax wouldn't congeal when we combined the two. We poured the warm oil into the wax and mixed with a stick.
Wednesday, June 22, 2011
Making Paper Out of Plant Stalks
Here is some of the burdock being prepared
After you get your stalks or office paper down to a pulp you pour it into a tray full of water. Next you will need two picture frames that are the same size, some screen, and a staple gun. Tightly staple the screen over the back of one of the frames (this will be your "deckle") and leave the other one how it is (this will be your mould). Place the open frame on top of the screened one so they marry up and leave a raised square edge around the screen. Dip the deckle in the tray and draw it out while keeping it flat so that the screen is evenly covered in pulp. Remove the mould frame, shake the excess water off the deckle and flip the deckle over onto a piece of felt. If your sheet of paper does not come off easy you can blow on the back of the screen a bit to loosen it up. Next put another piece of felt on top of the paper. Put the paper felt sandwich between two short planks and stand on top of it while shifting your weight to compress the paper and squeeze out excess water. Remove the top layer of felt and let the paper air dry in the sun. That's it! Paper!
Here is the process using office paper shreddings
Here is some of the burdock paper. The uneven edge is called a "deckle edge," an indicator that the paper was handmade.
You can also add texture and designs by laying down objects before the compressing stage. This piece had a few leaves that left behind impressions.
This one is a mix of burdock and paper shreddings.
Here's Matt with some of the paper we made
Saturday, June 18, 2011
Distilling Essential Oils
This week in farmstead arts we distilled essential oils from both peppermint and orange peels. The process first involved acquiring the materials, so a group of us went out and harvested some mint, and another group acquired some orange peels from the kitchen. We then pulled the mint leaves off the stems and cut up some of the stems, as well as cutting the orange peels into roughly 1 inch pieces, so that they would fit into the distillation vats. We then filled up each of the 2 bottom vats 2/3 of the way up with water, and after some fiddling with the stills, we got them plugged in and working.
It’s a pretty cool process, this distilling business. The bottom, water filled tank sits on a burner and is brought to a boil. The rising steam then ascends through the biomass, in this case mint and orange peel, held in the tank above it, carrying the many substances, including the essential oils, upwards into a smaller tube, where it begins to collect in the form of condensation, which slowly begins to collect in the still head. Eventually it begins to drip down the condenser, where cool water kept in the tube outside the condensing chamber causes rapid condensation. This then runs down the condenser into the receiver, where a layer of oil forms on top of the water, which is gradually forced out by the increasing amount of oil. The bulk of oil will come off in the first 10 to 30 minutes, but the entire process usually takes between 1 and 3 hours. We also noticed that the water that collected condensation was very potent smelling, especially with the mint. This is hydrosol, which apparently has other uses, such as in soaps, lotions, cleansers, and all kinds of other nifty things! Hydrosol is heavily fragrant water, and I discovered how potent it really is when I took a drink of the mint hydrosol…. It’ll definitely get you out of bed in the morning.
There are many uses for essential oils, such as in aromatherapy, medicinal uses, and in salves and creams. The cleaning product H2Orange that is used to clean the floors here is essential oil based, which is a green alternative to all the harsh chemicals usually used in commercial cleaning products. Distilling the oils from the orange peel was also a good way to find alternative uses for what would have otherwise gone straight to the compost pile.
While we were in the stage Jody dubbed as the “hurry up and wait” step, we all sat around in the lab and discussed capitalism and how its roots are in the downfall of the Roman Empire.
Overall, the distillation process was really cool, and a nice contrast to all the more rustic things we’ve been doing in class. I think it would be cool to do some more distillation, especially with things like comfrey that contains huge amounts of oil. Looking forward to a lot of time in the lab using (and hopefully not breaking) the still.